Thursday, January 23, 2025
Seize The Birthday - Kraft & Red

Wednesday, January 22, 2025
Visible Image - Teenage Birthday
Morning! Now, that's not a greeting that you get to say often to a teenager, but teenagers are our focus this week. And I've brought you a twofer of teenage birthday cards, albeit accidentally.
I wanted to make a graffiti background, so I started by covering an A5 card panel with Distress Inks, swiping the full-sized pads directly onto the paper, then using the mini pads to fill in the gaps.
Then I placed the Graffiti stencil over the panel, and used a blending tool to fill the spaces with Black Soot Oxide. I has to be Oxide because the normal Black Soot doesn't give as dense a coverage.
Looks a bit of a mess at this stage, but when you remove the stencil the colours really pop through the black.
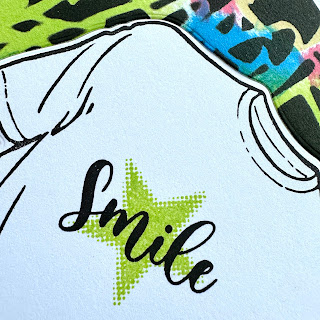
Meanwhile I stamped the T-shirt from Nothing to Wear, added a star and the 'smile' from the same set, then die cut it using the coordinating die.
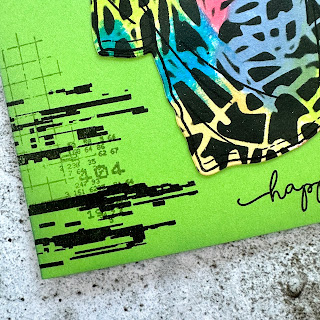
I popped the T-shirt die onto the panel to give me an idea of placement for the white T-shirt, then I realised that if I die-cut the T-shirt out of the panel I could inlay the white T-shirt, and have a graffiti t-shirt for another card - win, win!
To complete my first card it was just a case of lining up the white T-shirt into the graffiti panel and securing it on the reverse with some washi tape, then mounting it onto my white card base.
Here's a close-up of the smile logo on the T-shirt.
Now to the bonus card! Once I'd die cut the graffiti T-shirt I placed it into the white negative diecut on the MISTI then lined up the stamp to stamp the outline (pity I hadn't left the stamp on the 'MISTI). Stamping the outline gives the die-cut shape so much definition.
All of these products are available on the Visible Image website, go treat yourself!
Thursday, January 09, 2025
Seize The Birthday - Use Something New
Hello, and Happy New Year from the Seize The Birthday Team! Our first challenge of the year has been set by Cathy, and it's Use Something New.

It's a great challenge to start the year because it means we get to play with our new Christmas or Black Friday goodies, if we haven't already ;)
I took advantage of the Sizzix sales of Tim Holtz products a while back, and the goodies have been piled up waiting to be used. And now Tim is stepping back from releases, the bank balance has heaved a sigh of relief and I might get to actually use what I have instead of stockpiling (separate hobby).
Anyway, I used Brushstroke Flowers #1 and the ladybird from Funky Insects. And in line with my New Year's resolution (again!) to try to join in more challenges, I'm adding this to Darnell's NBUS challenge.

Hopefully as the year progresses I'll manage to enter a few more challenges and beat last year's attempts.
Pop on over to the Seize The Birthday blog to see what new products the rest of the design team have used, and join in. You could play Anything Goes if you prefer.
We also have three surprise party guests for this challenge - Amanda Mertz from Did You Stamp Today?, who is with us for the next two months, and previous winners Valerie and Denise.
See you in the gallery!
Wednesday, January 08, 2025
Visible Image - The Great Outdoors
Morning, Visible Image fans! Our theme this week is The Great Outdoors. As I write this post the Great Outdoors isn't being very kind to us. After heavy rain and winds, my village is flooded with some access routes blocked. Somehow the flood defences didn't do the job this time. Fortunately our house is on slightly higher ground so we're not directly affected.
So naturally I'm thinking of better days and nicer weather, and what is nicer than seeing dragonflies dancing across water, with all the tiny specs and particles dancing with them.
I started by stamping the images and sentiment from Live In The Moment using my MISTI stamping platform, making sure that the card was aligned right into the corner, because I was going to overstamp later.
I used the Curves stencil to create water across the lower section of the panel with Tumbled Glass and Peacock Feathers Distress Inks.
I added Tim Holtz Distress Spritz in Tumbled Glass and Crushed Olive across the top of the panel, dropped some of the spritz onto my mat and painted in the wings, adding a touch of Antique Linen as well.
The sheen is gorgeous!
Wednesday, December 25, 2024
Visible Image - Celebrate!
It's Christmas Day, and the theme this week at Visible Image is, not surprisingly, Celebrations! My brief was Clean and Simple - simples!
A bottle of bubbly is great for any celebration, so I stamped the bottle and cork from the Anyone For Bubbles set, and coloured them with markers.
The co-ordinating dies making cutting out so much easier!
I arranged the pieces on my blank card panel so that I knew where to stamp the bubbles, then stamped in Versamark and embossed with gold embossing powder. I also stamped the sentiment in Versafine Onyx Black to balance the black of the bottle.
The gold embossing catches the light beautifully.
I matted the panel onto gold card to pick out the gold embossing, then placed the bottle outside the mat. Originally I was going to trim the bottle to the bottom corner of the white panel, but changed my mind.
The card base is a two-tone bottle green that also catches the light beautifully.
When I'm stamping and cutting images, I always do a few extra - (a) in case of mistakes and (b) if Im lucky, no mistakes but a little stash for future projects!
Merry Christmas, and I hope Santa brings you everything you wish for! And if he hasn't, go treat yourself to some Visible Image goodies!
Wednesday, December 11, 2024
Visible Image - Thank You
Thursday, November 28, 2024
Seize The Birthday - Masculine


